On the way of yoga, friends who pay attention to yoga practice either in yoga or on the way of Yoga know that their own practice is completely different from that of having a teacher with practice.

Especially when they are assisted by the teacher, their awareness of the body is improved instantly, and they will suddenly understand “Oh, this pose should work like this, this side should be extended…”.

When assisted by the teacher, your understanding of asana will become suddenly enlightened.

Today, I’ll show you the adjustment techniques of 10 yoga postures.

I hope you can better understand the power point of the postures in the process of watching.

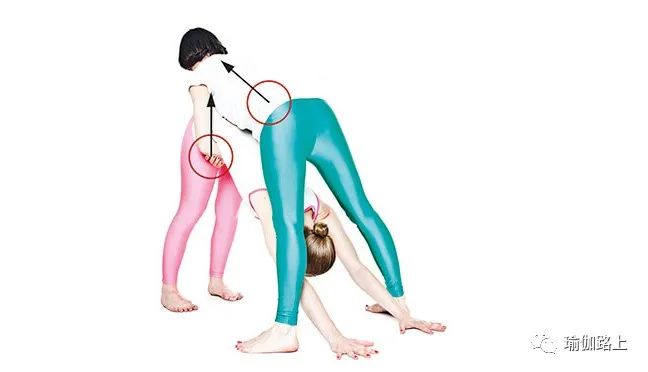
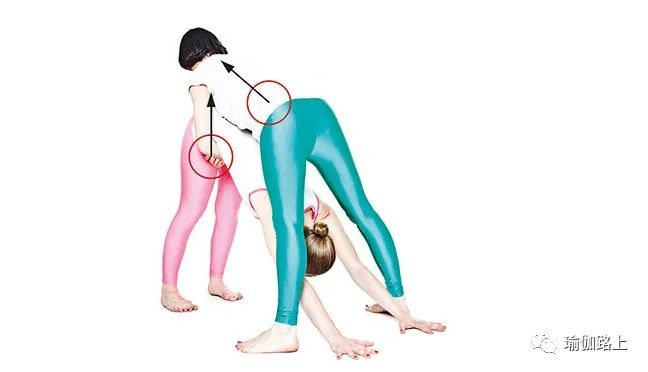
Adjustment techniques of 10 yoga postures ↓↓ 1 Put both hands on the back of the practitioner’s hand in downward dog pose, press down slightly, especially at the position of tiger’s mouth.

Press the ground down hard, gently grasp the practitioner’s big arm, rotate outward slightly to find the space between the shoulder and neck, put the right hand behind the right ankle, press down, put the left hand on the practitioner’s thigh (close to the knee), rotate the thigh inward, pull the muscle in front of the thigh backward, and put both hands behind the ankle to press down, Keep your heels firmly on the ground, hold your elbows around the practitioner’s abdomen, remind the core to retract and lift up, and use your upper body to lift the practitioner’s pelvis back and up 2 Put the plow hands on the back of the exerciser’s ankles, pull the knees back against the exerciser’s waist, lift the hands up, hold the root of the exerciser’s thighs, guide the pelvis to the foot, cover the exerciser’s hips with the yoga belt with both hands, lift the yoga belt up with both hands, let the exerciser cover his ankles with both hands, pull both legs back, hold the exerciser’s hips with both hands, and rotate the pelvis to the foot 3 Half fish twist one knee kneeling behind the practitioner, with the left foot on the inner side of the right foot, the left knee against the outer upper body of the practitioner’s ribs, the right hand pulls the practitioner’s right shoulder backward, and the left hand assists the practitioner’s spine to extend upward; the right hand pulls the front side of the practitioner’s right shoulder backward and upward, and the left hand lifts the right hand on the outer side of the practitioner’s right knee, sinks the right hand on the right side of the practitioner’s hip, and the left hand guides the left shoulder upward 4 The left hand of the boat is placed on the upper back of the practitioner to guide the spine to extend upward.

The right knee is against the lower part of the practitioner’s knee fossa to straighten the legs.

The right hand is placed under the practitioner’s lower leg to give a steady force to lift up.
5 Stand behind the exerciser with a balanced forward bend, put your knees against the exerciser’s back, hold the exerciser’s ankles with both hands, and move closer to your body.
6 Sit and bend your right knee forward against the back of the practitioner’s hip, put your hands on the root of the thigh, guide the internal rotation of the thigh, and compact them down behind the practitioner, kneel and stabilize the pelvis, put your hands on the outside of the shoulder blades and extend forward.
For beginners, you can first use your right hand to guide the spine to extend upward, put your left hand on the left shoulder, guide and open your shoulders, lift your chest up and sit behind the practitioner, step your feet on both sides of the upper end of the pelvis, and rotate the pelvis forward 7 In camel pose, kneel on one knee behind the exerciser, hold the upper back with both hands and extend upward.
At the same time, lengthen the back and sit on the back of the exerciser, put one foot on the hip and push forward, and put the other foot on the upper back to guide the spine to extend to the top of the head.
Hold the big arm with both hands and rotate outward 8 Stand behind the exerciser in the side panel style, with the right knee against the back of the left hip, the right on the front of the right hip, spread backward, the left hand on the front of the left shoulder, extend upward on one knee behind the exerciser, the right hand on the outside of the right hip, the left hand on the outside of the left rib, guide the outside of the rib to the left hand, extend the legs upward, clamp the exerciser’s right thigh, stabilize both hands and hips, and the right hand on the outside of the right shoulder blade, Stabilize the body and guide the practitioner’s left hand to extend obliquely upward by 9 Soldier II stands behind the exerciser with both hands under the exerciser’s small arms, extends the right foot to both sides against the outer side of the exerciser’s right foot, compacts the outer side of the right foot downward, and guides the outer rotation of the right thigh with both hands, and takes root in the ground at the same time Stand behind the exerciser in baby pose, press the exerciser’s pelvis with both hands, compress the lower leg downward, clamp both sides of the hip and extend back, put both hands on the outside of the shoulder blades, and guide the spine to extend forward to practice the yoga pose.
First understand the yoga pose, where to extend, where to exert force, and how to cooperate with breathing.
I hope the above adjustment of yoga postures can make you better understand the disintegration of yoga postures, draw inferences from one instance, and make your postures practice and teaching get twice the result with half the effort- Today’s topic: it’s totally different to practice by yourself and by the teacher.
Talk about your experience ~ welcome to leave a message.
Before 12:00 on February 14, we will select the most lucky fans from the selected messages and send out a pair of Yoga Pants below (multicolor).
For those who have won the prize in the past, the prize will be automatically postponed to the next Jiayou ~..


