Today we will share how to apply three stretching methods (passive, resistive, and active) to address common limitations in the wrist, upper body, and hip areas.

Physical flexibility is a small aspect of yoga, but for many of us, maintaining a healthy range of muscle and joint activity is an undeniable benefit of regular asana practice.

However, there seems to be no consensus on how to stretch: some teachers emphasize the benefits of passive stretching, while others give priority to the range of motion we actively create through muscle participation rather than using gravity or props.

The reality is that our bodies benefit from diversity, which is why there is not much improvement when we repeatedly use stretching techniques in areas we think are troublesome.

In fact, to choose a method to stretch, it is better to use a series of strategies to obtain the benefits of each method, just like the three methods I outlined below.

1.

passive range of motion (PROM) skill passive range of motion is the deepest position you can create for any particular joint without requiring muscles to work.

We explored this range of motion in passive stretching with the help of gravity, props or partners.

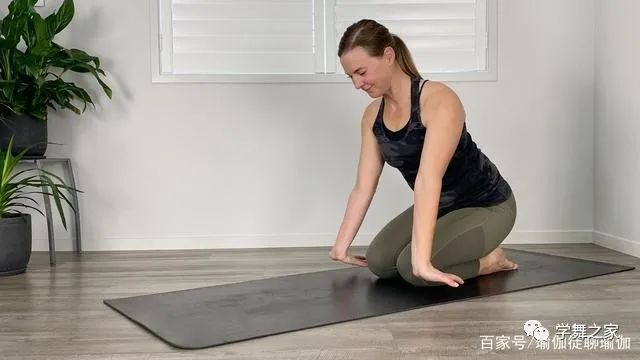
For example, sitting in Virasana passively stretches our quadriceps.

The current understanding is that the passive stretching training nervous system can withstand a larger range of movements without triggering contraction of our muscles or connective tissue to protect our joints.

This concept is cleverly used in restorative yoga to release chronic tension, while in Yin Yoga, it is more deliberately used in our connective tissue.
Either way, patience is the key.
This technique works best when we are comfortable enough to relax in a position for at least 60 seconds.
2.
resistance range of motion (rrom) skill the resistance range of motion looks similar to the passive range of motion, but feels completely different.
In this technique, we increase muscle activation in the passive stretching position.
In heroic pose, your quadriceps briefly stretches without moving, pressing down on your toes and calves, just as you want to lift your hips off the ground.
It takes advantage of a reflex called spontaneous inhibition (also known as Golgi tendon reflex, because receptors in Golgi tendon organs play a role in regulating this response).
This reflex causes the muscle to relax after intense contraction or deep stretching, so as to reduce the chance of the muscle exerting greater than normal force on the tendon.
You may have used this method in a stretching method called proprioceptive neuromuscular facilitation or PNF.
The most common form of PNF is hold relaxttechnique, which contracts the muscle equidistantly for about 7-10 seconds without moving, and then relaxes the muscle into another passive stretch, which is usually deeper than the initial stretch and lasts for at least 10-15 seconds.
3.
active range of motion (AROM) technology within the range of motion, we move muscles on the other side of the joint.
If we focus on the quadriceps, we will use the hamstring, an antagonist of the quadriceps, to actively bend the knee.
So instead of using gravity to help us stretch in heroic poses, we can lie on our faces, contract our hamstrings, and keep our heels as close to our hips as possible.
When the muscle activity lasts for about 10 seconds, the working effect of the active range of activity is the best.
For most of us, active range of motion is more limited than passive range of motion.
It may not feel stretched in the target muscle – it will feel more like muscle activity or work – but it does show us the range of our activities without assistance.
Our range of motion is limited: for each of us, there is an end point determined by the shape and proportion of our bones.
However, within these limits, the combination of regular use of the above technologies may increase the scope of our activities.
You can apply this method to any field, but here we will solve common problems for yoga students: wrist (wrist extension), chest (shoulder blade contraction and shoulder external rotation), hip (hip flexion and external rotation) wrist wrist extension (1) is a common challenge for yoga students.
Wrist extension refers to the action of making a “stop” sign with the hand.
The back of our hands moves toward the forearm, joining the extensor and lengthening the flexor.
(2) In yoga postures, we need to bear the weight of both hands.
For example, inclined plank, chaturangadandasana, urdhvamukhasvanasana, vasisthasana and arm balance, such as crow, will exceed the comfort range of many of us, especially the students who have just come into contact with yoga.
However, in yoga classes, the wrist is rarely stretched.
The setting of this exercise varies from person to person, depending on the range of motion of the wrist and the length of the arm (compared to the length of the torso).
You place your palm flat on the floor with your fingers pointing to the back of the mat.
This may mean that your hand is next to you (the wrist forms a 90 degree angle), in front of you (more stretching is required), or behind you (less stretching is generated).
Some people will sit cross legged, while others will kneel or sit comfortably on a bench.
Try which method is best for you.
Prom: slowly move your hand forward from where you started, so that your forearm will be close to the back of your hand.
Keep your wrists extended until you feel a slight stretch between the inside of your forearm and the bottom of your wrist or finger, or until your heels begin to lift off the ground.
Hold this position, take four or five deep breaths slowly, and keep your neck and shoulders relaxed..


